
My relationship with 3D modeling and animation started in 1982 when I first used VU-3D on a Sinclair ZX Spectrum home computer.
It was so basic yet so exciting to be able to build wireframe models of cubes, spheres, toroids… I recall I was always keeping in mind the first Tron movie as a dream.
Then came the glorious Amiga in 1986: I’ve been spending nights watching a single pixel being drawn by primitive ray-tracing software and running on a 8 Mhz M68000 CPU.
In 1992, I began using Autodesk 3D Studio on a ‘486 DOS+Windows 3.11 tower PC.
I wrote for several years a regular 3D Studio column on a now-defunct Autocad-related magazine (“Mondo Autocad”) and I’ve been always amazed by the evolution of 3D modeling and rendering software, even though I’ve been working on web site development for living.
Back to 2011.
I discover a pretty project (thanks to long-time friend Paolo) within Autodesk Labs that really enables me to join together some things I love most:
- 3D modeling
- 3D rendering
- digital photography
- cloud computing
- iPad leveraging
 So here I am to explain my adventure in 3D-land with Autodesk Photofly, an outstanding, cloud-based – and completely free (yes, it’s free!) amazing software! (and how to let the iPad join this party!)
What it does
The unimaginable, simply put.
Provided you shoot several digital photos and you take care of a few simple rules, your subject will be turned into a full-fledged (sort-of) 3D model you can save as a DWG file, just to start.
Imagine how much time you spent digizing points to build from scratch a 3D model of a building or an industrial product: ok, now you almost got the idea of what you get…
Requirements
A Windows-equipped PC (so sorry, no Mac OS X version as of today); Windows XP up to Windows 7 64-bit are supported.
You will need to check all necessary .NET framework libraries since the Photofly editor uses them and won’t start unless the environment is perfectly set up.
You will of course need a digital camera and an internet connection.
Where do I begin?
First things first.
Check the Photofly page on Autodesk Labs.
You will need to register (it’s free) to Autodesk and this new account will allow you to download the installer package PhotoSceneEditor.msi (it’s some 60 MB).
Install software as usual, and beware of warnings related to .NET Framework dependencies: you’ll need to install the very latest .NET from Microsoft (either 32- or 64-bit versions).
If you’re able to launch PhotoFly Scene editor without getting an error you’re ready to begin.
Now, shut down your PC, grab your digital camera and get back in the real world looking for a suitable subject.
What subject to shoot and how?
I started with very simple objects by shooting some 15-20 pictures with my compact camera (Canon SX100, 8 MP) just to make it easier to experiment.
You should choose subjects you can turn around or you can easily shoot from different point of view and remain at almost the same distance.
Remember also to keep the same focal length (that is: do not touch the zoom) in all the picture set, and, wherever possible, the same exposure settings.
This is easily done by shooting in A mode, that is Aperture-priority, so that speed (time) will change and not aperture and/or depth of field.
Let’s look at a typical shooting with the 15 pictures below I’ve taken in Venice in the last days of July.

As you can see, I’ve been making a 360-degrees turn-around this stone column to catch it all.
Now, back to PC, I copied all pictures in a project-related directory: the reason for this lies in the fact that Photofly creates some weird file names and temporary files so i’ts better to keep things organized.
Ready? Fire Photofly Scene Editor and the screen below is what you’ll get:

Click on the Create a new photo scene and select all pictures needed for a single rendering.

Now click on the Compute Photo Scene button and choose between waiting for the work to be completed or just get an e-mail when Photofly it’s done working.

Photofly will be working like this:
– it will upload all images to Autodesk Cloud computing facility,
– it will wait for the Cloud to work in the images’ batch,
– it will download the 3D model on your PC.
When all the hard work it’s done, this is what you’ll get, a 3D model and all camera set in the correct shooting point in space:

You will be given the default Draft quality settings which will be good enough to start; any further details will require uploading again to Autodesk’s cloud the entire 3D model.
You can even check which shooting account for which 3D detail by clicking on the bottom pictures timeline and looking at the viewport:

Now what?
One of the very first thing you’ll be tempted to do is create an animation right from Photofly: courtesy of Autodesk, you’re lucky enough this is easier to do than to explain…
As with all animation software, you’ll need to create an animation path, that is the path that the virtual camera/observer will be following and its point of view will be rendered in the animation.
You can start with your own camera path so you’ll just use the camera shooting point and get a detailed animation in few minutes.

You can save this video to the local PC in .AVI file format or you can share it on Youtube, provided you have a valid account: Photofly will take into account all details.
This is just a sample result on my Youtube channel:
What about iPad?
 Of course you can export this 3D model in several file format, namely .DWG, .OBJ and… .IPM
What is IPM? It’s Autodesk format for Inventor Publisher Mobile and, yes, there’s an app for this!
You can download here the Inventor Publisher Mobile viewer for iPad and it’s completely free!
Download it and install it on your iPad.
On the PC, save/export your models from Photofly in the .IPM format (this will take a little extra time).
Connect your iPad to the PC (or a networked Mac, just like me) and run iTunes.
 In the App tab you’ll get all the installed apps along with the app data associated.
This is the place where you can drag&drop, or click on Add to…, your IPM files.
When you’re done syncing the iPad, this is what you’re likely to get:
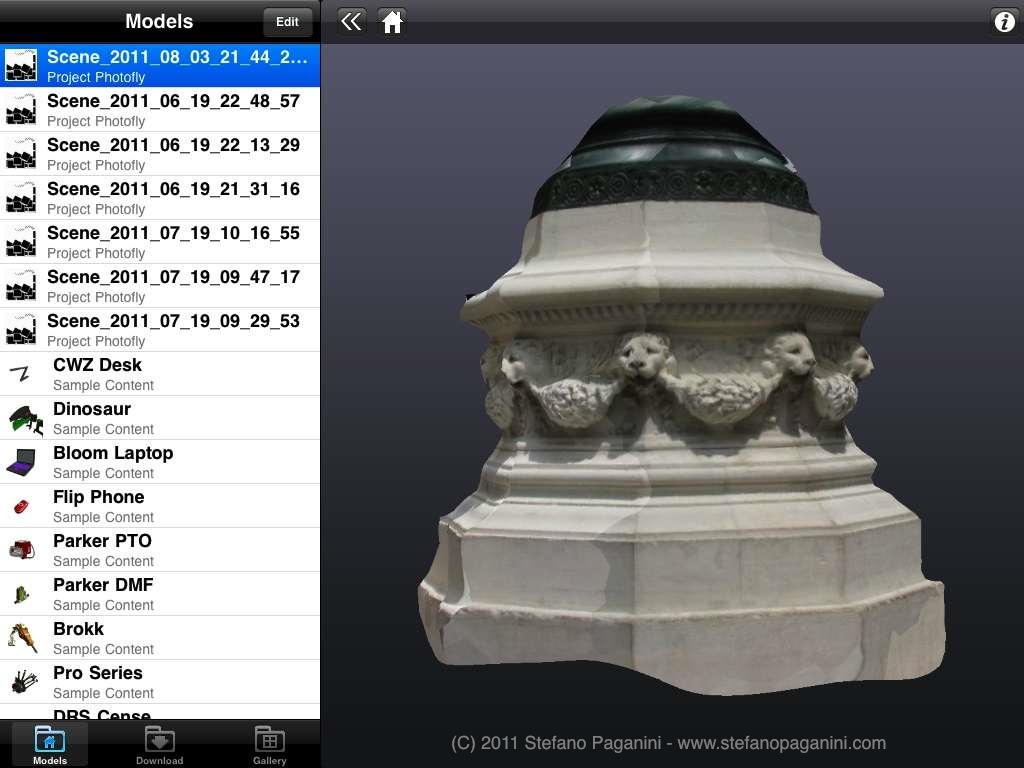
You can turn, zoom in and out, move as you like the 3D model: just like a Sci-Fi movie device…
I’ve been practicing with real-world objects related to buidings but Photofly can be useful also to designers needing to show 3D prototypes around the world/net.
Real-world application for this kind may be countless for architects, designers, engineers, real-estate operators or simply if you’re just looking at a nice building (or object) and want to have it at your fingertips!
Enjoy 3D!!!
For further reference, check these links too:
- Venice lamp basement stone [IPM model, iPad-ready]
- Column detail, Venice corner of Palazzo Ducale [IPM model, iPad-ready]
- Venice corner of Palazzo Ducale [IPM model, iPad-ready]
- Detail of the facade of Certosa di Pavia [IPM model, iPad-ready]
- Photo Scene Editor handbook [PDF]
- Photofly system requirements
- Photofly tutorial on Youtube
Pingback: Autodesk 123D: design in 3D, print, cut, create (yes, it’s that easy!) | Stefano Paganini: mining for web, marketing, technology, fun